Override System
Arastta is built using MVC design pattern which allows separation of concerns between the data and the presentation. In our case, the view part is where all the theme related code is placed.
All the files related to the admin panel are placed in the admin directory. Files dealing with store front are placed in the catalog directory. What we are really interested in is the catalog/theme/default directory which includes the only built-in theme provided by Arastta.
Arastta use fallback system, it's mean that when it doesn't find certain template in your theme, it will find on default theme folder. So to make a new theme, you don't need to copy all file from default theme. The great benefit of this is that you only need to edit very few files to make a completely different looking theme.
Default theme structure
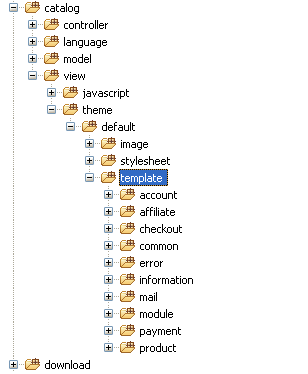
image: As you've likely guessed, all the image files related to the theme go here.
stylesheet: Skinning related code, which is likely to be CSS files, will go here.
template: As the name suggests, you can find all the store front template files here. All the template files are organized in a modular way to keep things neat and clean.
Creating a new theme
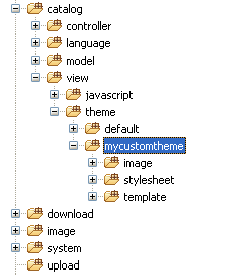
In order to override the output, you must create a new theme. Let's create a new directory, named mycustomtheme underneath catalog/view/theme directory. After that, you need to create three more directories within the mycustomtheme directory: image, stylesheet, and template.
Overriding the default theme
NEVER copy the entire default folder and just rename it. This will make updating much more difficult. As mentioned above, the default theme fallback system does all the job for you. Only copy files from the default folder as needed when making custom changes to the structure of those pages.
Copy the followings in order to override the output:
- catalog/view/theme/default/stylesheet/ALL_FILES
- catalog/view/theme/default/image/ALL_FILES
- catalog/view/theme/default/template/common/header.tpl
Open the catalog/view/theme/mycustomtheme/template/common/header.tpl file, find and replace all references to default with mycustomtheme in that file.
Now go back to template folder 'mycustomtheme' and open the info.json file. Adapt any information like name of the theme, author, e-mail contact, description of the theme etc. to your needs. Later on you can open the other files within that folder to adjust more features of your theme.
Finally, go to admin panel, then settings page and change the theme from default to mycustomtheme.